Friday, 4 December 2015

Codecademy.CSS.Session1

1. make the text inside <span></span> tags blue.
answer:
span {
color: blue;
}

2. Tell the span selector that you want the font-family to be cursive.
answer:
span{
font-family: cursive;
}

3. Insert a <link> to stylesheet.css in index.html between/inside your <head></head> tags.
answer:
<link type="text/css" rel="stylesheet" href="stylesheet.css">
4. Most tags are not self-closing
5. Make the font color of the p selector green.
answer:
p {
color: green;
}
6. One selctor many properties
Underneath your color:green property-value pair (but befor the final }!), set the font-family to Garamond and the font-size to 24px.
Answer:
p{
color: green;
font-family: Garamond;
font-size: 24px;
7. Make all the h3 headings red.
Set all the paragraphs to the Courier font-family.
The second paragraph text between
<span></span>tags. Set teh background-color of that <span> to 'yellow'
Answer:
h3 {
color: red
}
p {
font-family: Courier;
/* Remember to capitalize first character of your color */
}
span
{
background-color:yellow;
}
8. Put semicolon!
9. Commented out p selector
Answer:
/*
p {
color:red;
}
*/

Wednesday, 2 December 2015

Semua orang mempunyai otak, tapi tidak semua orang mampu menggunakannya.


Semua tag-HTML bisa menggunakan semua style CSS. Tapi lebih spesifik, biasanya tag:
1. <a> selalu dipakaikan style:
text-decoration
2. Footer selalu dipakaikan copyright

Tuesday, 1 December 2015

CSS: CSS Border

Algoritmanya:
1. Menentukan style/gaya bordernya
2. Menentukan besar
3. Menentukan warna

CSS: CSS selector

Untuk CSS selector terdiri dari:
1. CSS selector jenis element
2. CSS selector jenis id
3. CSS selector jenis class

So you want to make an Operating System ?

First thing we need to do is creating Disk Operating System. The most common.
So, how?

So what are the components?
1. Hardware
2. Application program
3. User
4. Operating system

What are the operating sytem in this world?
1. UNIX
2. MS-DOS

So, what are hardware in this world?
A lot-lot

How to run a DOS?
You can use VMWare Player to run it.

Jadi apa saja yang dilakukan oleh DOS?
1. Nomor interupt hardware
2.
Jika dulu elemen adalah air, api, tanah dan udara.
Sekarang elemen adalah cahaya, suara dan cuaca/temperatur. Siapa yang bisa mengontrol ini yang menang.


Apa itu cahaya? (defenition)
Cahaya adalah gelombang elektromagnetik.

Apa yang bisa kita lakukan pada cahaya? (method)
Dibengkokkan, dibelokkan(reflect),  dihentikan?, dikurangi (reduce?),

Apa saja properti cahaya? (properti)
Sudut cahaya


Javascript

Javascript is a computer code that can do these thing to your webpage:
1
1. HTML
- add an home page
- add an about page
2. CSS
- add site.css
- edit index.html add script link href & add div id main in the body
- edit about.html add link href to site.css

3. Javascript
- add script.js --> script hanya menampilkan tanggal
- edit homepage: add footer, include script.js (script that you just created)

4. Edit stylesheet
- add table, etc
- add customer.html: add data table dan footer.

5. Adding Navigation
- edit script.js --> add something on behalf of something.
- stylesheet
- edit index.html --> add <nav id="nav01">
- edit about.html ---> add <nav id="nav01"> below body tag
- edit customers.html --> add <nav id="nav01"> below body tag

6. Fetching data
1. AppML
2. JSON

CSS

Fundamental of CSS are:
# targetting id

CSS are code that can modify these upon your html tag:
1. background-color (keyword: background-color)
2. text-color (keyword: color)
3. padding
4.
5.


CSS box model
Keyword: text, padding, border, and margin (Te,Pad,Bor,Mar)

Monday, 30 November 2015

Javascript: Outputting text

I want to output a text into/inside a local paragraf instead of using canvas. How can I do that?

There are 5 steps you need to do:
1. First thing you need to define the paragraph where you want to the text to showed up. Like this:
<p></p>

2. Second thing, you need to insert a span tag into that paragraph tag. Like this below:
<p><span></span></p>

3. Third, you need to give an id to that span tag; just the opening tag, not the closing tag. Like this below:
<p><span id="here"></span></p>

4. Last you need to define below inside your script tag:
<script>
document.getElemenytById("here").innerHTML="<your text>"

</script>

5. Last, finish, run the code.

Warning: Remember to use .innerHTML not .value.

For complete code:
<body>
<p><span id="here"></span></p>

<script>
document.getElementById("here").innerHTML = "<your text>"
</script>
</body>

Javascript: Converting hexadecimal to decimal

I want to convert hexadecimal value (for i.e. "0xff") to a decimal value, how can I do this?

1. Put your hexadecimal-value into a string and then into a variable, like this below:
var a = "0xff" //don't forget the double-quotes

2. then use a function like this:


I usually dealing hexadecimal value with color.
Test

Javascript: Operating on a string

What can we do upon a string?
1. Looking its length
2. Searching index of a string from it
3. Extracting a string from it
4. Inserting a string into it.

Looking for how long / length

a.length


Searching for index
indexOf()
lastIndexOf()

Powerful search using RegEx.

Extracting parts
slice(firstindex, lastindex)

You want to convert a string that contain hex value to a decimal?

You want to convert a string that contains hex value to a decimal? How can you do that?

For example:
var x="#fffffa"
You can't convert this type of string into decimal-number. Reason: because there is a pound (#) sign inside that string. Solution: remove the pound sign first.

This case is retrieving value from <input type="color">


JavaScript Data Types

JavaScript Data Types

In JavaScript there are 5 different data types that can contain values:
  • string
  • number
  • boolean
  • object
  • function
There are 3 types of objects:
  • Object
  • Date
  • Array
And 2 data types that cannot contain values:
  • null
  • undefined

Bagaimana cara menggunakan google spreadsheet sbg database kamu

It looks like you must build your own API tools.

What is API?
An API is a set of methods and tools that can be used for building software applications.

So how?
Learn to use Youtube API, learn to use googlespreadsheet API, twitter API, learn to use google map API.

Where?
www.codecademy.com
or

For i.e.:
1. Create an object; learn object oriented programming
2. 


Sunday, 29 November 2015

WLAN Security: WEP mode

WEP 64-bits :
For each key, please enter either (1) 5 characters excluding symbols, or (2) 10 characters ranging from 0~9, a, b, c, d, e, f.

WEP 128-bits :
For each key, please enter either (1) 13 characters excluding symbols, or (2) 26 characters ranging from 0~9, a, b, c, d, e, f.

Friday, 27 November 2015

Jadi, apa saja yg diberikan ISP kepada kamu? Selain bandwidth link?

What ISP should offer you:
4 Mbps down / 1 Mbps up
10 email accounts
1 GB Web Server Space


Time to load = bandwidth x size of website
For i.e.:
To load a 2MB website = 4 MB/s 
What ISP should offer you:
4 Mbps down / 1 Mbps up
10 email accounts
1 GB Web Server Space

Thursday, 26 November 2015

<script>
var j = 0
var spaceindex=[]
var text1 = "saya suka bahasa java banget deh"
for (i=0;i<=text1.length;i++)
{

if (text1[i] == " ")
{
spaceindex[j]=i
j = j + 1
}
}

for (i=0;i<=spaceindex.length - 1;i++)
{
alert(text1.substr(0,spaceindex[i]))
}
</script>
1. define canvas tag
2. define width
3. define height
4. define id
5. define style: style="border:1px solid blue;"

1. define button
2. define onclick
3. define value = Load

1. define script
2. define function: showpictures()
3. define canvas
4. define ctx
5. define img

Template to experiment with string

<input type="text" id="text1" value="I learn new thing now">

<script>
var mydata=document.getElementById("text1").value

alert(typeof(mydata))
mydata.


</script>

Punctuation


" " = seperate word.
"." = end a sentences.
", " = seperate 2 sentences.
"! " = put it in the end of sentence of instruction or order.
"? " = put it in the end of sentence of question.
"-" = connecting 2 words.
"--" =


Example:
Open the door! not Open the door?

Name
" " = "space"
"." = "dot"
"," = "comma"
"!" = "exclamation mark"
"?" = "question mark"
"-" = "hypen"
"--" = "double hypen"

Font

Here is the list that I compile myself

Tipe font: Tahoma
Width:
Alfabet:
A = 7 pixels
a = 6 pixels
B = 7 pixels
b = 6 pixels

Reading sign (punctuation):
" " = 3 pixels
, = 3 pixels
. =  3 pixels
- = 3 pixels
-- = 6 pixels
? = 6 pixels
! = 3 pixels

Numba:
1 = 6 pixels
2 = 6 pixels
21 = 12 pixels
Conclusion:
The width are vary. Dataset: {3, 6, 7}.

For depth about punctuation: http://perjuangan9.blogspot.co.id/2015/11/punctuation.html
Divide into:
1. Body
2. Head

Addtional:
1. Tell me what have you done after reading the vacancy?

Write one paragraph after one paragraph.

Dear Ms. Jobhunt,

I am writing to express my interest in the Retail Management Trainee position you listed recently on the MOC Job Network. I have reviewed Enterprise Rent-a-Car's web page and am very impressed with your company's commitment to excellent customer service and your employee development trainning program. I will be graduating from Mount Olive College in August and am actively seeking a retail management position.

As you will note in the enclosed resume. I have had meaningful practical experience in both retail sales and customer service.


Wednesday, 25 November 2015

1. Register site: www.tokoris.com
2. Create adcode unit and paste code to your site's (1) widget.
3. Restart your modem
4. Clear your browser's cookies
5. Receive email permit or not permit

Application Letter Project

Update 25/11/2015:
<canvas width="800" height="600" id="canvas1"

style="border:1px solid blue";>
</canvas>


<form style="border:1px">
1. Address/location of submitter:<input type="text"

id="location_submitter" value="Wreck"><br />
2. Name of submitter: <input type="text"

id="name_submitter"><br />
3. Name of company: <input type="text"

id="name_company"><br />
4. Field of job that you will submit to submitter:

<input type="text" id="field_job"><br />
5. Date of graduation: <input type="text"

id="date_graduation"><br />
6. Your relevant experiences: <input type="text"

id="relevant_experiences"><br />
7. Your cerfication : <input type="text"

id="relevant_certification"><br />
8. Your contact number: <input type="text"

id="contact_number"><br />
9. Date you want to assign the application letter:

<input type="text" id="date_assign">
<input type="button" value="Load" onclick="writecan

()">
</form>


<script>
var canvas=document.getElementById("canvas1");
var ctx=canvas.getContext("2d");
var loc_submitter;
var name_submitter;
var name_company;
var field_job;
var date_graduation;
var


function ambildata()
{
loc_submitter = document.getElementById

("location_submitter").value;

name_submitter = document.getElementById

("name_submitter").value;

name_company = document.getElementById

("name_company").value;


field_job = document.getElementById

("field_job").value;


date_graduation = document.getElementById

("date_graduation").value;

relevant_experiences = document.getElementById

("relevant_experiences").value;


relevant_certification=document.getElementById

("relevant_certification").value;


contact_number = document.getElementById

("contact_number").value;

date_assign = document.getElementById

("date_assign").value;


}

function writecan()
{
ambildata();

alert("location: " + typeof(loc_submitter));
ctx.fillText("To: " + name_submitter ,10, 50);
}

</script>


Idiom

Idiom ada beberapa macam/kategori misalnya:
1. Idiom tentang Cinta
1.1 Bagai pungguk merindukan bulan
1.2 Cintaku bertepuk sebelah tangan
1.3 Kasih tak sampai
1.4 Nelangsa
1.5 Bagai Hujan tanpa awan

<canvas width="800" height="600" id="canvas1"

style="border:1px solid blue";

onmouseenter=drawtext() >


</canvas>
<input type="button" onclick="showpictures()"

value="Load">

<script>
var canvas = document.getElementById("canvas1");
var ctx = canvas.getContext("2d");
function showpictures()
{

var img = new Image();
img.src = "Cisco";
ctx.drawImage(img, 10, 10);
}

function drawtext()
{
ctx.fillText("Hello World",10,50);
}

</script>

Blogger can only inline

Blogger can only inline
Inline javascript
Inline stylesheet

3 IFRAME by Totardo

Iframe 1:

Iframe 2:

Iframe 3:

Link for Iframe 1: Link for Iframe 2: Link for Iframe 3:
Copyright Totardo

History:

<body style="background-color:blue">

<table border="1px" align="center" style="background-color:yellow">
<tr style="background-color:red">
<td colspan="3" style="text-align:center"><h1>3 IFRAME by Totardo</h1></td>
</tr>
<tr>
<td><h2>Iframe 1:</h2><iframe id="iframe1"></iframe></td>
<td><h2>Iframe 2:</h2><iframe id="iframe2"></iframe></td>
<td><h2>Iframe 3:</h2><iframe id="iframe3"></iframe></td>
</tr>
<tr>
<td>Link for Iframe 1: <input type="text" id="text1"><input type="button" Value="Load" onclick="loadbutton1()"></td>
<td>Link for Iframe 2: <input type="text" id="text2"><input type="button" value="Load" onclick="loadbutton2()"></td>
<td>Link for Iframe 3: <input type="text" id="text3"><input type="button" value="Load" onclick="loadbutton3()"></td>
</tr>
<tr>
<td colspan="3" style="text-align:center">Copyright Totardo</td>
</tr>
<tr><td colspan="3">
<p>History: <br/>
<span id="demo"></p></td></tr>
</table>

<script>
var myhistory = [];
var tempvar=0;
var mysentence="";

function loadbutton1()
{
x = document.getElementById("text1").value;
document.getElementById("iframe1").src = x;
loopz(x);
}

function loadbutton2()
{
y = document.getElementById("text2").value;
document.getElementById("iframe2").src = y;
loopz(y);
}

function loadbutton3()
{
z = document.getElementById("text3").value;
document.getElementById("iframe3").src = z;
loopz(z);
}

function loopz(i)
{
for (m==0;m==tempvar;m++)
{
if(myhistory[m]==myhistory[tempvar])
{
alert("will be breaked");
break;
}
myhistory[tempvar]=i;
}

if (tempvar==0)
{
mysentence = myhistory[tempvar];
}
mysentence = mysentence + ", "+ myhistory[tempvar];
tempvar = tempvar + 1;
document.getElementById("demo").innerHTML=mysentence;
}
</script>

Tuesday, 24 November 2015

HOW-TO Draw Canvas on HTML

Javascript commands are case sensitive. Like below:
You can't write docuement.
Better use notepad++.


1. Mouse object properties


2. Accessing html input properties
Suppose you created:
<input type="text" id="text1">
</input>
http://www.w3schools.com/jsref/prop_text_value.asp

3. Accessing mouse events-list

Monday, 23 November 2015

DHCP

I want to make a host that enter/connect to my LAN either via switch or via access-point take/receive automatically proper IP address without I must configure it. How can I do that?

Frame Relay

I want to connect my store branch to my headquarter via Frame Relay network. How can I configure my router?

HSRP

I want host to switch to another router as their gateway without I manually change their gateway address. How can I configure all of my internal/local routers to support this requirement?

On each router, go to their inside-interface's configuration mode, do and type these:
1. Add virtual IP address.
Usually virtual IP address is the first usable IP address from the IP address segment. So like this:
R1(config)#int f0/0
R1(config-if)# standby ip 192.168.1.1
2. Set which router be the preempt
3. Set the priority

Virtual mac-address

What is virtual mac-address?
Virtual mac-address is will be used as L2 address of L3 virtual interfaces.

Where did this virtual mac-address came from?
At first, I think both routers will do some kind of negotiation upon their will be used virtual mac-address. But it is not. The virtual mac-address is decided/derived by each router directly, via configuring group number, group number 1 in this case, into their standby command. They don't need to negotiate the mac-address using sending and receiving packet.

So if you configure R1's with: standby 1 ip address 192.168.1.1, then it will directly derives its virtual mac-address as:  and if you configure R2's with: standby 2 ip address 192.168.1.1, then it will directly derives its virtual mac-address as: .

Both router will start sending an ARP gratuitos packet (L2 packet that have source-address himself and destination-address himself also) and switch that connect to them will start record it inside its mac-address table. Like this:


NAT

Lets make user able to go to internet and our server able to be accessed via internet.

System of NAT consist of:
1. Access-list
2. Pool of public address
3.

Static NAT is always exist or always on. It doesn't need inside-user to go to internet first before it created inside border-router. So, outside-user can PING to inside-user anytime without requiring inside-user to PING that outside-user first.

Server is always uses static NAT not Dynamic NAT because Server is needed to be able to be accesses anytime without that server try PING to any outside-user first.

While, Dynamic NAT isn't always exist or always on. It requires inside-user to go to internet first before this type of NAT created inside border-router.

So, we need addtional knowledge to define which router's interface is inside and which interface is outside. This knowledge is important for both static NAT and dynamic NAT. Inside interface of NAT is usually

Outside interface of NAT usually interface that have public address.

Static NAT's command is begin with ip nat inside source static and so on. While Dynamic NAT's command is begin with ip nat inside source list and so on.

Static NAT

All information that we need to configure static NAT are IP address private that Server belong and IP address public that we want the private IP address change/transfered/mapped .
R2(config)#ip nat inside source static 192.168.20.254 209.165.202.131

Static NAT can also be used to do port forwarding. For instance: I want to change Web server port from 80 to 8080.
R2(config)#ip nat inside source static

Port forwarding static option (tcp and udp) available only in static NAT, like this:
R1(config)#ip nat inside source static ?
  A.B.C.D  Inside local IP address
  esp      IPSec-ESP (Tunnel mode) support
  network  Subnet translation
  tcp      Transmission Control Protocol
  udp      User Datagram Protocol

So, static NAT is without access-list. Dynamic NAT is with access-list.

Dynamic NAT

Dynamic NAT require a configuration of pool of public IP address, access-list and definition of outside-interface and inside-interface.

Access-list

Dynamic NAT requires an access-list to determine/define which IP addresses allowed/permitted to be translated by NAT. IP addresses that outside or not included inside that list will not be translated, forever, hence IP addresses that are not listed in the access-list will unable to go to internet until they included in the access-list.

Type of access-list that we used is just a standard named ACL. We use usually use named ACL not numbered ACL. Then we can reference this name from ....

Pool

To create pool we need to excludes public ip addresses that used for static NAT first but use mask that ISP give to customer/us a block of public ip address, like 255.255.255.252 if the ISP give us 4 public IP addresses to be used.

And also this pool need a name.


Ubuntu

By default, storage devices that are plugged into the system mount automatically in the /media/<username> directory

1. Find the disk using comand lsblk

2. Find the name of the disk, in my case:
/sdb1

3. Create mounting point
sudo mkdir /media/external


Observing Hard Disk properties/parameters

So what are heads, sectors/track, cylinders, etc. of a Hard disk properties is all about?

Picture 1

Sector 0 of the disk is called the Master Boot Record (MBR). Within the MBR there is a field that identifies the format for each partition on the disk. For example NTFS is 07 (hexadecimal), FAT32 is 0B, Linux is 83, etc.

Sunday, 22 November 2015

Don't reinvent the wheel what thats mean?

Dont reinvent the wheel means use the template code that available on the internet and written in various language.

Can we use table as to layout an html?

Can we use table as to layout an html?

Although we can achieve pretty nice layouts with HTML tables, but tables weren't really designed as a layout tool. Tables are more suited to presenting tabular data.

1. Inheritance
2.

So what is this layout "div" method algorithm?

First, container, div-child will adjust their stand/place/position according to div-container's width and height. So let us see:

 <div id="parent">
<div id="child1" >
</div>
<div id="child2" >
</div>
<div id="child3" >
</div>
</div>

And inside it we add texts/sentences:

<div id="parent">
<h1> Hello World!</h1>
<div id="child1">
<h2>This is my biodata</h2>
I born at May 24th
</div>
<div id="child2">
<h2>This is my favourite place</h2>
Bandung
Jakarta
Manado
</div>
<div id="child3">
<h2>This is my favourite sports</h2>
Swimming
Javelin throw
</div>
</div>

Next, we add width property/paramater to parent-div and each child-div:

<div id="parent" style="width:100%">
<h1> Hello World!</h1>
<div id="child1" style="width:33.33%">
<h2>This is my biodata</h2>
I born at May 24th
</div>
<div id="child2" style="width:33.33%">
<h2>This is my favourite place</h2>
Medan
Bandung
Jakarta
Manado
</div>
<div id="child3" style="width:33.33%">
<h2>This is my favourite sports</h2>
Swimming
Javelin throw
</div>
</div>

Next we add background color to each div, this time we use css:

<div id="parent" style="width:100%; background-color:red">
<h1> Hello World!</h1>
<div id="child1" style="width:33.33%; background-color:brown">
<h2>This is my biodata</h2>
I born at May 24th
</div>
<div id="child2" style="width:33.33%; background-color:blue">
<h2>This is my favourite place</h2>
Medan
Bandung
Jakarta
Manado
</div>
<div id="child3" style="width:33.33%; background-color:green">
<h2>This is my favourite sports</h2>
Swimming
Javelin throw
</div>
</div>
Next we add to maintain code

<div id="parent" style="width:100%; background-color:red">
<h1> Hello World!</h1>
<div id="child1" style="width:33.33%; background-color:brown; float:left;">
<h2>This is my biodata</h2>
I born at May 24th
</div>
<div id="child2" style="width:33.33%; background-color:blue; float:left;">
<h2>This is my favourite place</h2>
Medan
Bandung
Jakarta
Manado
</div>
<div id="child3" style="width:33.33%; background-color:green; float:left;">
<h2>This is my favourite sports</h2>
Swimming
Javelin throw
</div>
</div>

Congratulations! You have made it! Up to this steps you have able to build  3 layout design.

Demonstartion

Now to demonstrate that childs is obey their parent, do this like below:

<div id="parent" style="width:50%; background-color:red">
<h1> Hello World!</h1>
<div id="child1" style="width:33.33%; background-color:brown; float:left;">
<h2>This is my biodata</h2>
I born at May 24th
</div>
<div id="child2" style="width:33.33%; background-color:blue; float:left;">
<h2>This is my favourite place</h2>
Medan
Bandung
Jakarta
Manado
</div>
<div id="child3" style="width:33.33%; background-color:green; float:left;">
<h2>This is my favourite sports</h2>
Swimming
Javelin throw
</div>
</div>

Belajar PHP

1. Mengetikkan teks ke halaman html
<?php
echo "Hello world";
?>
Cacti Readme File

REQUIREMENTS:

Cacti should be able to run on any Unix-based operating system with
the following requirements:

PHP 5.1+
MySQL 5.0+
RRDTool 1.0.49+, 1.4+ recommended
NET-SNMP 5.2+
Web Server that supports PHP

PHP Must also be compiled as a standalone cgi or cli binary. This is required
for data gathering in crontab.

A Note About RRDtool:

RRDTool is available in multiple versions and a majority of them are supported
by Cacti.  Please remember to confirm your Cacti settings for the RRDtool
version if you having problem rendering graphs.

Also important to note in version Cacti 0.8.6h and above, graph items with
no color assigned are now properly presented to RRDTool.  The upgraded
will fix graph items that will cause your graphs not to render, but as
always, please remember to backup before you proceed to upgrade.


ABOUT CACTI:

Cacti is a complete frontend to RRDTool, it stores all of the necessary
information to create graphs and populate them with data in a MySQL database.
The frontend is completely PHP driven. Along with being able to maintain
Graphs, Data Sources, and Round Robin Archives in a database, cacti handles
the data gathering. There is also SNMP support for those used to creating
traffic graphs with MRTG.

Data Sources

To handle data gathering, you can feed cacti the paths to any external
script/command along with any data that the user will need to "fill in",
cacti will then gather this data in a cron-job and populate a MySQL
database/the round robin archives.

Data Sources can also be created, which correspond to actual data on the
graph. For instance, if a user would want to graph the ping times to a host,
you could create a data source utilizing a script that pings a host and returns
it's value in milliseconds. After defining options for RRDTool such as how to
store the data you will be able to define any additional information that the
data input source requires, such as a host to ping in this case. Once a data
source is created, it is automatically maintained at 5 minute intervals.

Graphs

Once one or more data sources are defined, an RRDTool graph can be created
using the data. Cacti allows you to create almost any imaginable RRDTool graph
using all of the standard RRDTool graph types and consolidation functions.
A color selection area and automatic text padding function also aid in the
creation of graphs to make the process easier.

Not only can you create RRDTool based graphs in cacti, but there are many
ways to display them. Along with a standard "list view" and a "preview mode",
which resembles the RRDTool frontend 14all, there is a "tree view", which
allows you to put graphs onto a hierarchical tree for organizational purposes.

User Management

Due to the many functions of cacti, a user based management tool is built in
so you can add users and give them rights to certain areas of cacti. This would
allow someone to create some users that can change graph parameters, while
others can only view graphs. Each user also maintains their own settings when
it comes to viewing graphs.

Templating

Lastly, cacti is able to scale to a large number of data sources and graphs
through the use of templates. This allows the creation of a single graph or
data source template which defines any graph or data source associated with it.
Host templates enable you to define the capabilities of a host so cacti can
poll it for information upon the addition of a new host.

So What is SNMP means?

If you know the number of OID, the IP address and the password, you know what parameter of network-device you like to ask/view. You can monitor the device!

The system divide into configuring SNMP on a network-device and on SNMP server, like this below
R2(config)#snmp-server ?
  community  Enable SNMP; set community string and access privs

In computing, an object identifier or OID is an identifier used to name an object

So what is setup mode?

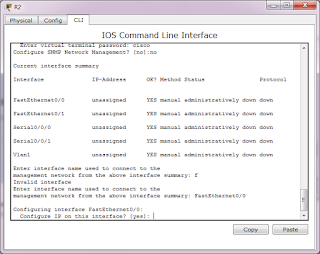
Setup mode is available when a router is started for the first time. Like this below:

Picture 1


So what for?

To provide a basic configuration for the router. Packet Tracer supports only basic management setup, which limits you to configuring only a single interface that can connect to a management system that will supply the remainder of the configuration. Router R2 is an existing router that has been added to the network. We will clear any existing configuration and use setup mode to connect it to router R1.

So what can we do in setup mode?

  • Confirm the use of the configuration dialog by entering yes.
  • Enter basic management setup by entering yes (this is the only option supported by Packet Tracer).
  • Enter R2 for the host name.
  • Enter class for the enable secret.
  • Enter cisco for the enable password.
  • Enter cisco for the virtual terminal password.
  • Enter FastEthernet0/0 for the interface name used to connect to the management network.
  • Confirm the configuration of IP on the interface.
  • Enter 192.168.2.2 for the interface IP address.
  • Accept the default subnet mask.
  • Accept the default to save this configuration to nvram and exit.
After you entered picture 1 with 'yes', you will get this picture:

Picture 2
 And after you enter picture 2 with 'yes' you will get this picture below:

Picture 3


Picture 4

Picture 5

Picture 6

Picture 8

Picture 9

Picture 10

Picture 11

Picture 12

Picture 13


Saturday, 21 November 2015

Proper connection test

So what is proper connection test?

Routing loops

Causing you can't ping / telnet and when you do traceroute from PC its like this below:


So what is the final cause of this problem? It is the misconfigured static route within two router or within a pair of router.

Friday, 20 November 2015

You can confirm whether it's there or not by doing the following:

Click on the Start button
Type 'disk manage' in search field
Click on "Create and format hard disk partitions" in search results
Look for anything that says "Recovery" or "OEM" partition in the Disk Management window

How to summerize address

How can I use interfaces loopback to summerize 2 or more network or subnet address?

We can use interface loopback to summerize 2 or more network or subnet address that been given to us to summerize.

Ok, for  you want to summerize these 3 subnetwork addresses:
172.30.1.0/24
172.30.2.0/24
172.30.3.0/24

First, assign each interfaces
R1(config)#int lo0
R1(config-if)# ip address 172.30.1.1 255.255.255.0
R1(config)#int lo1
R1(config-if)# ip address 172.30.2.1 255.255.255.0
R1(config-if)# int lo2
R1(config-if)# ip address 172.30.3.1 255.255.255.0

and then show ip route, like below:


Thursday, 19 November 2015

RIP

Lets make all of our router's network databases is same or synchronized and let RIP chooses what better path.

Specifying the network:
1. For each router that want to RIP process routing, configure their directly-connected network just at their classful boundary. No use if you define them at their classless address. Like below:
R1(config)# router rip
R1(config-router)# network 192.168.1.0
R1(config-router)# network 192.168.2.0

Configure RIP's passive interface:
1. For interfaces in each router, define what interface that should be blocked from sending RIP's packet a.k.a don't participate in sending packet of RIP update about network update. So we continue/add our previous config above with below:
R1(config-router)#passive-interface f0/0

But before we add that config/command, we need to show ip protocols, like below:

R1#show ip protocols
Routing Protocol is "rip"
Sending updates every 30 seconds, next due in 26 seconds
Invalid after 180 seconds, hold down 180, flushed after 240
Outgoing update filter list for all interfaces is not set
Incoming update filter list for all interfaces is not set
Redistributing: rip
Default version control: send version 1, receive any version
  Interface             Send  Recv  Triggered RIP  Key-chain
  FastEthernet0/0       1     2 1  
  Serial0/0/0           1     2 1  
Automatic network summarization is in effect
Maximum path: 4
Routing for Networks:
    192.168.1.0
    192.168.2.0
Passive Interface(s):
Routing Information Sources:
    Gateway         Distance      Last Update
    192.168.2.2          120      00:00:18
Distance: (default is 120)

And now assign:
R1(config-router)# passive-interface fa0/0


And show ip protocols again, like below:
R1#show ip protocols
Routing Protocol is "rip"
Sending updates every 30 seconds, next due in 18 seconds
Invalid after 180 seconds, hold down 180, flushed after 240
Outgoing update filter list for all interfaces is not set
Incoming update filter list for all interfaces is not set
Redistributing: rip
Default version control: send version 1, receive any version
  Interface             Send  Recv  Triggered RIP  Key-chain
  Serial0/0/0           1     2 1  
Automatic network summarization is in effect
Maximum path: 4
Routing for Networks:
    192.168.1.0
    192.168.2.0
Passive Interface(s):
    FastEthernet0/0
Routing Information Sources:
    Gateway         Distance      Last Update
    192.168.2.2          120      00:00:00
Distance: (default is 120)

Notice that now FastEthernet0/0 is gone from interface list (list of interface that participate in RIP routing protocol a.k.a active interfaces).

Watch for automatic-summerization.
This is the hardest part to understand with RIPv1. So watch it.
Discontiguos network means is not using subnets of one major network.
Contiguous networks means is using subnets of one major network.

RIP isn't good/better at discontiguos network.

If your networks is inside/using one same major network of IP address, then RIPv1 is good to go. Like this:
172.16.0.0/19
172.16.32.0/19
172.16.64.0/29
172.16.96.0/29
172.16.128.0/29


But if your networks isn't inside/using one same major network, then RIPv1 is wreck/error/fail. For instance like this:
172.16.0.0/19
172.16.32.0/19
172.16.64.0/19
192.168.1.0/24
192.168.2.0/24

I even made a quiz/contest, who able to make above network work with RIPv1 I will give IDR 100.000.

Or, you can use discontiguous networks, but you need to arrange the placement of those networks carefully. Or, just don't use subnets with RIPv1. What I mean is use classful address, don't do subnetting.

Another solution to RIPv1 is using really different major network, like below:
192.168.1.0/24
192.168.2.0/24
192.168.3.0/24
192.168.4.0/24
192.168.5.0/24

While, RIPv2 have 2 options, RIPv1 have 1. Poor RIPv1.

Everytime you given a topology that contains:

Ok. Thats it for automatic summerization. Our next guest is propagating default-route.

Propagating default-route

If you have a router that have an internet connection then that router is a what-we-call a boundary-router.

To tell a router to advertises its default-route is simple. Just use "default-information originate" inside the mode of router RIP configuration mode. Like below:
R1(config)# router rip
R1(config-router)# default-information originate