Monday, 23 November 2015

Observing Hard Disk properties/parameters

So what are heads, sectors/track, cylinders, etc. of a Hard disk properties is all about?

Picture 1

Sector 0 of the disk is called the Master Boot Record (MBR). Within the MBR there is a field that identifies the format for each partition on the disk. For example NTFS is 07 (hexadecimal), FAT32 is 0B, Linux is 83, etc.

Sunday, 22 November 2015

Don't reinvent the wheel what thats mean?

Dont reinvent the wheel means use the template code that available on the internet and written in various language.

Can we use table as to layout an html?

Can we use table as to layout an html?

Although we can achieve pretty nice layouts with HTML tables, but tables weren't really designed as a layout tool. Tables are more suited to presenting tabular data.

1. Inheritance
2.

So what is this layout "div" method algorithm?

First, container, div-child will adjust their stand/place/position according to div-container's width and height. So let us see:

 <div id="parent">
<div id="child1" >
</div>
<div id="child2" >
</div>
<div id="child3" >
</div>
</div>

And inside it we add texts/sentences:

<div id="parent">
<h1> Hello World!</h1>
<div id="child1">
<h2>This is my biodata</h2>
I born at May 24th
</div>
<div id="child2">
<h2>This is my favourite place</h2>
Bandung
Jakarta
Manado
</div>
<div id="child3">
<h2>This is my favourite sports</h2>
Swimming
Javelin throw
</div>
</div>

Next, we add width property/paramater to parent-div and each child-div:

<div id="parent" style="width:100%">
<h1> Hello World!</h1>
<div id="child1" style="width:33.33%">
<h2>This is my biodata</h2>
I born at May 24th
</div>
<div id="child2" style="width:33.33%">
<h2>This is my favourite place</h2>
Medan
Bandung
Jakarta
Manado
</div>
<div id="child3" style="width:33.33%">
<h2>This is my favourite sports</h2>
Swimming
Javelin throw
</div>
</div>

Next we add background color to each div, this time we use css:

<div id="parent" style="width:100%; background-color:red">
<h1> Hello World!</h1>
<div id="child1" style="width:33.33%; background-color:brown">
<h2>This is my biodata</h2>
I born at May 24th
</div>
<div id="child2" style="width:33.33%; background-color:blue">
<h2>This is my favourite place</h2>
Medan
Bandung
Jakarta
Manado
</div>
<div id="child3" style="width:33.33%; background-color:green">
<h2>This is my favourite sports</h2>
Swimming
Javelin throw
</div>
</div>
Next we add to maintain code

<div id="parent" style="width:100%; background-color:red">
<h1> Hello World!</h1>
<div id="child1" style="width:33.33%; background-color:brown; float:left;">
<h2>This is my biodata</h2>
I born at May 24th
</div>
<div id="child2" style="width:33.33%; background-color:blue; float:left;">
<h2>This is my favourite place</h2>
Medan
Bandung
Jakarta
Manado
</div>
<div id="child3" style="width:33.33%; background-color:green; float:left;">
<h2>This is my favourite sports</h2>
Swimming
Javelin throw
</div>
</div>

Congratulations! You have made it! Up to this steps you have able to build  3 layout design.

Demonstartion

Now to demonstrate that childs is obey their parent, do this like below:

<div id="parent" style="width:50%; background-color:red">
<h1> Hello World!</h1>
<div id="child1" style="width:33.33%; background-color:brown; float:left;">
<h2>This is my biodata</h2>
I born at May 24th
</div>
<div id="child2" style="width:33.33%; background-color:blue; float:left;">
<h2>This is my favourite place</h2>
Medan
Bandung
Jakarta
Manado
</div>
<div id="child3" style="width:33.33%; background-color:green; float:left;">
<h2>This is my favourite sports</h2>
Swimming
Javelin throw
</div>
</div>

Belajar PHP

1. Mengetikkan teks ke halaman html
<?php
echo "Hello world";
?>
Cacti Readme File

REQUIREMENTS:

Cacti should be able to run on any Unix-based operating system with
the following requirements:

PHP 5.1+
MySQL 5.0+
RRDTool 1.0.49+, 1.4+ recommended
NET-SNMP 5.2+
Web Server that supports PHP

PHP Must also be compiled as a standalone cgi or cli binary. This is required
for data gathering in crontab.

A Note About RRDtool:

RRDTool is available in multiple versions and a majority of them are supported
by Cacti.  Please remember to confirm your Cacti settings for the RRDtool
version if you having problem rendering graphs.

Also important to note in version Cacti 0.8.6h and above, graph items with
no color assigned are now properly presented to RRDTool.  The upgraded
will fix graph items that will cause your graphs not to render, but as
always, please remember to backup before you proceed to upgrade.


ABOUT CACTI:

Cacti is a complete frontend to RRDTool, it stores all of the necessary
information to create graphs and populate them with data in a MySQL database.
The frontend is completely PHP driven. Along with being able to maintain
Graphs, Data Sources, and Round Robin Archives in a database, cacti handles
the data gathering. There is also SNMP support for those used to creating
traffic graphs with MRTG.

Data Sources

To handle data gathering, you can feed cacti the paths to any external
script/command along with any data that the user will need to "fill in",
cacti will then gather this data in a cron-job and populate a MySQL
database/the round robin archives.

Data Sources can also be created, which correspond to actual data on the
graph. For instance, if a user would want to graph the ping times to a host,
you could create a data source utilizing a script that pings a host and returns
it's value in milliseconds. After defining options for RRDTool such as how to
store the data you will be able to define any additional information that the
data input source requires, such as a host to ping in this case. Once a data
source is created, it is automatically maintained at 5 minute intervals.

Graphs

Once one or more data sources are defined, an RRDTool graph can be created
using the data. Cacti allows you to create almost any imaginable RRDTool graph
using all of the standard RRDTool graph types and consolidation functions.
A color selection area and automatic text padding function also aid in the
creation of graphs to make the process easier.

Not only can you create RRDTool based graphs in cacti, but there are many
ways to display them. Along with a standard "list view" and a "preview mode",
which resembles the RRDTool frontend 14all, there is a "tree view", which
allows you to put graphs onto a hierarchical tree for organizational purposes.

User Management

Due to the many functions of cacti, a user based management tool is built in
so you can add users and give them rights to certain areas of cacti. This would
allow someone to create some users that can change graph parameters, while
others can only view graphs. Each user also maintains their own settings when
it comes to viewing graphs.

Templating

Lastly, cacti is able to scale to a large number of data sources and graphs
through the use of templates. This allows the creation of a single graph or
data source template which defines any graph or data source associated with it.
Host templates enable you to define the capabilities of a host so cacti can
poll it for information upon the addition of a new host.

So What is SNMP means?

If you know the number of OID, the IP address and the password, you know what parameter of network-device you like to ask/view. You can monitor the device!

The system divide into configuring SNMP on a network-device and on SNMP server, like this below
R2(config)#snmp-server ?
  community  Enable SNMP; set community string and access privs

In computing, an object identifier or OID is an identifier used to name an object

So what is setup mode?

Setup mode is available when a router is started for the first time. Like this below:

Picture 1


So what for?

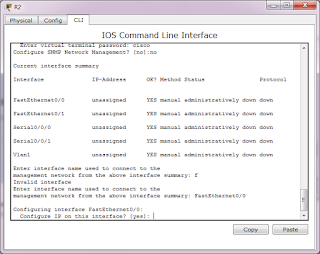
To provide a basic configuration for the router. Packet Tracer supports only basic management setup, which limits you to configuring only a single interface that can connect to a management system that will supply the remainder of the configuration. Router R2 is an existing router that has been added to the network. We will clear any existing configuration and use setup mode to connect it to router R1.

So what can we do in setup mode?

  • Confirm the use of the configuration dialog by entering yes.
  • Enter basic management setup by entering yes (this is the only option supported by Packet Tracer).
  • Enter R2 for the host name.
  • Enter class for the enable secret.
  • Enter cisco for the enable password.
  • Enter cisco for the virtual terminal password.
  • Enter FastEthernet0/0 for the interface name used to connect to the management network.
  • Confirm the configuration of IP on the interface.
  • Enter 192.168.2.2 for the interface IP address.
  • Accept the default subnet mask.
  • Accept the default to save this configuration to nvram and exit.
After you entered picture 1 with 'yes', you will get this picture:

Picture 2
 And after you enter picture 2 with 'yes' you will get this picture below:

Picture 3


Picture 4

Picture 5

Picture 6

Picture 8

Picture 9

Picture 10

Picture 11

Picture 12

Picture 13