I want to connect my store branch to my headquarter via Frame Relay network. How can I configure my router?
Monday, 23 November 2015
HSRP
I want host to switch to another router as their gateway without I manually change their gateway address. How can I configure all of my internal/local routers to support this requirement?
On each router, go to their inside-interface's configuration mode, do and type these:
1. Add virtual IP address.
Usually virtual IP address is the first usable IP address from the IP address segment. So like this:
R1(config)#int f0/0
R1(config-if)# standby ip 192.168.1.1
2. Set which router be the preempt
3. Set the priority
Virtual mac-address is will be used as L2 address of L3 virtual interfaces.
Where did this virtual mac-address came from?
At first, I think both routers will do some kind of negotiation upon their will be used virtual mac-address. But it is not. The virtual mac-address is decided/derived by each router directly, via configuring group number, group number 1 in this case, into their standby command. They don't need to negotiate the mac-address using sending and receiving packet.
So if you configure R1's with: standby 1 ip address 192.168.1.1, then it will directly derives its virtual mac-address as: and if you configure R2's with: standby 2 ip address 192.168.1.1, then it will directly derives its virtual mac-address as: .
Both router will start sending an ARP gratuitos packet (L2 packet that have source-address himself and destination-address himself also) and switch that connect to them will start record it inside its mac-address table. Like this:
On each router, go to their inside-interface's configuration mode, do and type these:
1. Add virtual IP address.
Usually virtual IP address is the first usable IP address from the IP address segment. So like this:
R1(config)#int f0/0
R1(config-if)# standby ip 192.168.1.1
2. Set which router be the preempt
3. Set the priority
Virtual mac-address
What is virtual mac-address?Virtual mac-address is will be used as L2 address of L3 virtual interfaces.
Where did this virtual mac-address came from?
At first, I think both routers will do some kind of negotiation upon their will be used virtual mac-address. But it is not. The virtual mac-address is decided/derived by each router directly, via configuring group number, group number 1 in this case, into their standby command. They don't need to negotiate the mac-address using sending and receiving packet.
So if you configure R1's with: standby 1 ip address 192.168.1.1, then it will directly derives its virtual mac-address as: and if you configure R2's with: standby 2 ip address 192.168.1.1, then it will directly derives its virtual mac-address as: .
Both router will start sending an ARP gratuitos packet (L2 packet that have source-address himself and destination-address himself also) and switch that connect to them will start record it inside its mac-address table. Like this:
NAT
Lets make user able to go to internet and our server able to be accessed via internet.
System of NAT consist of:
1. Access-list
2. Pool of public address
3.
Static NAT is always exist or always on. It doesn't need inside-user to go to internet first before it created inside border-router. So, outside-user can PING to inside-user anytime without requiring inside-user to PING that outside-user first.
Server is always uses static NAT not Dynamic NAT because Server is needed to be able to be accesses anytime without that server try PING to any outside-user first.
While, Dynamic NAT isn't always exist or always on. It requires inside-user to go to internet first before this type of NAT created inside border-router.
So, we need addtional knowledge to define which router's interface is inside and which interface is outside. This knowledge is important for both static NAT and dynamic NAT. Inside interface of NAT is usually
Outside interface of NAT usually interface that have public address.
Static NAT's command is begin with ip nat inside source static and so on. While Dynamic NAT's command is begin with ip nat inside source list and so on.
R2(config)#ip nat inside source static 192.168.20.254 209.165.202.131
Static NAT can also be used to do port forwarding. For instance: I want to change Web server port from 80 to 8080.
R2(config)#ip nat inside source static
Port forwarding static option (tcp and udp) available only in static NAT, like this:
R1(config)#ip nat inside source static ?
A.B.C.D Inside local IP address
esp IPSec-ESP (Tunnel mode) support
network Subnet translation
tcp Transmission Control Protocol
udp User Datagram Protocol
So, static NAT is without access-list. Dynamic NAT is with access-list.
Type of access-list that we used is just a standard named ACL. We use usually use named ACL not numbered ACL. Then we can reference this name from ....
And also this pool need a name.
System of NAT consist of:
1. Access-list
2. Pool of public address
3.
Static NAT is always exist or always on. It doesn't need inside-user to go to internet first before it created inside border-router. So, outside-user can PING to inside-user anytime without requiring inside-user to PING that outside-user first.
Server is always uses static NAT not Dynamic NAT because Server is needed to be able to be accesses anytime without that server try PING to any outside-user first.
While, Dynamic NAT isn't always exist or always on. It requires inside-user to go to internet first before this type of NAT created inside border-router.
So, we need addtional knowledge to define which router's interface is inside and which interface is outside. This knowledge is important for both static NAT and dynamic NAT. Inside interface of NAT is usually
Outside interface of NAT usually interface that have public address.
Static NAT's command is begin with ip nat inside source static and so on. While Dynamic NAT's command is begin with ip nat inside source list and so on.
Static NAT
All information that we need to configure static NAT are IP address private that Server belong and IP address public that we want the private IP address change/transfered/mapped .R2(config)#ip nat inside source static 192.168.20.254 209.165.202.131
Static NAT can also be used to do port forwarding. For instance: I want to change Web server port from 80 to 8080.
R2(config)#ip nat inside source static
Port forwarding static option (tcp and udp) available only in static NAT, like this:
R1(config)#ip nat inside source static ?
A.B.C.D Inside local IP address
esp IPSec-ESP (Tunnel mode) support
network Subnet translation
tcp Transmission Control Protocol
udp User Datagram Protocol
So, static NAT is without access-list. Dynamic NAT is with access-list.
Dynamic NAT
Dynamic NAT require a configuration of pool of public IP address, access-list and definition of outside-interface and inside-interface.Access-list
Dynamic NAT requires an access-list to determine/define which IP addresses allowed/permitted to be translated by NAT. IP addresses that outside or not included inside that list will not be translated, forever, hence IP addresses that are not listed in the access-list will unable to go to internet until they included in the access-list.Type of access-list that we used is just a standard named ACL. We use usually use named ACL not numbered ACL. Then we can reference this name from ....
Pool
To create pool we need to excludes public ip addresses that used for static NAT first but use mask that ISP give to customer/us a block of public ip address, like 255.255.255.252 if the ISP give us 4 public IP addresses to be used.And also this pool need a name.
Ubuntu
By default, storage devices that are plugged into the system mount automatically in the /media/<username> directory
1. Find the disk using comand lsblk
2. Find the name of the disk, in my case:
/sdb1
3. Create mounting point
1. Find the disk using comand lsblk
2. Find the name of the disk, in my case:
/sdb1
3. Create mounting point
sudo mkdir /media/external
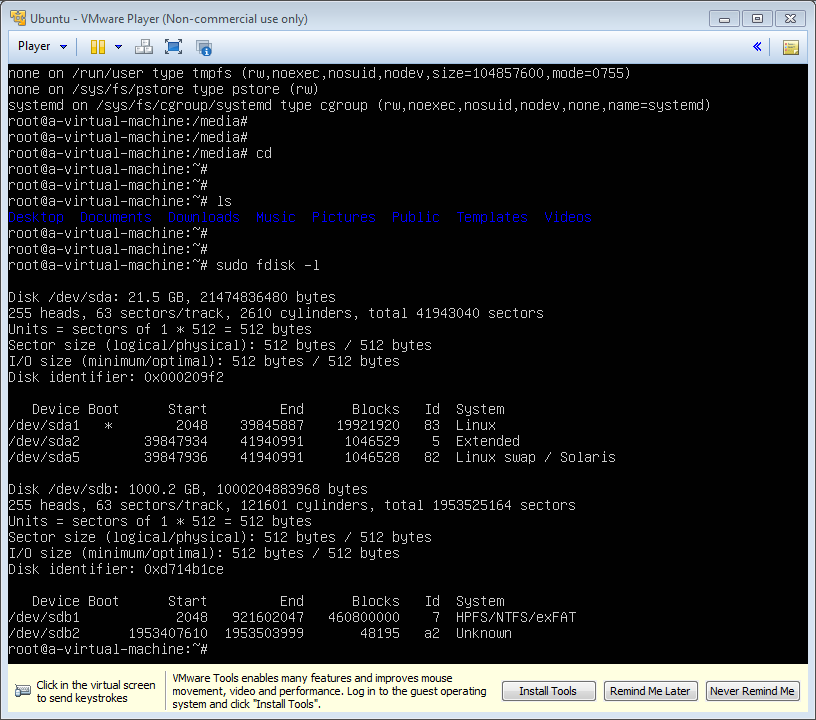
Observing Hard Disk properties/parameters
So what are heads, sectors/track, cylinders, etc. of a Hard disk properties is all about?
Sector 0 of the disk is called the Master Boot Record (MBR). Within the MBR there is a field that identifies the format for each partition on the disk. For example NTFS is 07 (hexadecimal), FAT32 is 0B, Linux is 83, etc.
 |
| Picture 1 |
Sector 0 of the disk is called the Master Boot Record (MBR). Within the MBR there is a field that identifies the format for each partition on the disk. For example NTFS is 07 (hexadecimal), FAT32 is 0B, Linux is 83, etc.
Sunday, 22 November 2015
Don't reinvent the wheel what thats mean?
Dont reinvent the wheel means use the template code that available on the internet and written in various language.
Can we use table as to layout an html?
Can we use table as to layout an html?
Although we can achieve pretty nice layouts with HTML tables, but tables weren't really designed as a layout tool. Tables are more suited to presenting tabular data.
1. Inheritance
2.
And inside it we add texts/sentences:
Next, we add width property/paramater to parent-div and each child-div:
Next we add background color to each div, this time we use css:
Congratulations! You have made it! Up to this steps you have able to build 3 layout design.
Although we can achieve pretty nice layouts with HTML tables, but tables weren't really designed as a layout tool. Tables are more suited to presenting tabular data.
1. Inheritance
2.
So what is this layout "div" method algorithm?
First, container, div-child will adjust their stand/place/position according to div-container's width and height. So let us see:
<div id="parent">
<div id="child1" >
</div>
<div id="child2" >
</div>
<div id="child3" >
</div>
</div>
<div id="child1" >
</div>
<div id="child2" >
</div>
<div id="child3" >
</div>
</div>
And inside it we add texts/sentences:
<div id="parent">
<h1> Hello World!</h1>
<div id="child1">
<h2>This is my biodata</h2>
I born at May 24th
</div>
<div id="child2">
<h2>This is my favourite place</h2>
Bandung
Jakarta
Manado
</div>
<div id="child3">
<h2>This is my favourite sports</h2>
Swimming
Javelin throw
</div>
</div>
<h1> Hello World!</h1>
<div id="child1">
<h2>This is my biodata</h2>
I born at May 24th
</div>
<div id="child2">
<h2>This is my favourite place</h2>
Bandung
Jakarta
Manado
</div>
<div id="child3">
<h2>This is my favourite sports</h2>
Swimming
Javelin throw
</div>
</div>
Next, we add width property/paramater to parent-div and each child-div:
<div id="parent" style="width:100%">
<h1> Hello World!</h1>
<div id="child1" style="width:33.33%">
<h2>This is my biodata</h2>
I born at May 24th
</div>
<div id="child2" style="width:33.33%">
<h2>This is my favourite place</h2>
Medan
Bandung
Jakarta
Manado
</div>
<div id="child3" style="width:33.33%">
<h2>This is my favourite sports</h2>
Swimming
Javelin throw
</div>
</div>
Next we add background color to each div, this time we use css:
<div id="parent" style="width:100%; background-color:red">
<h1> Hello World!</h1>
<div id="child1" style="width:33.33%; background-color:brown">
<h2>This is my biodata</h2>
I born at May 24th
</div>
<div id="child2" style="width:33.33%; background-color:blue">
<h2>This is my favourite place</h2>
Medan
Bandung
Jakarta
Manado
</div>
<div id="child3" style="width:33.33%; background-color:green">
<h2>This is my favourite sports</h2>
Swimming
Javelin throw
</div>
</div>
Next we add to maintain code
<div id="parent" style="width:100%; background-color:red">
<h1> Hello World!</h1>
<div id="child1" style="width:33.33%; background-color:brown; float:left;">
<h2>This is my biodata</h2>
I born at May 24th
</div>
<div id="child2" style="width:33.33%; background-color:blue; float:left;">
<h2>This is my favourite place</h2>
Medan
Bandung
Jakarta
Manado
</div>
<div id="child3" style="width:33.33%; background-color:green; float:left;">
<h2>This is my favourite sports</h2>
Swimming
Javelin throw
</div>
</div>
Congratulations! You have made it! Up to this steps you have able to build 3 layout design.
Demonstartion
Now to demonstrate that childs is obey their parent, do this like below:
<div id="parent" style="width:50%; background-color:red">
<h1> Hello World!</h1>
<div id="child1" style="width:33.33%; background-color:brown; float:left;">
<h2>This is my biodata</h2>
I born at May 24th
</div>
<div id="child2" style="width:33.33%; background-color:blue; float:left;">
<h2>This is my favourite place</h2>
Medan
Bandung
Jakarta
Manado
</div>
<div id="child3" style="width:33.33%; background-color:green; float:left;">
<h2>This is my favourite sports</h2>
Swimming
Javelin throw
</div>
</div>
Subscribe to:
Posts (Atom)